
We're still on a fairy kick here. I saw quite a while ago on Dollar Store Crafts, a link to a guy called Doug Rhodehamel who makes toadstools out of brown paper lunch bags. He makes hundreds and hundreds for outdoor displays. They look like a lot of fun, and I'm sure I'll be able to get the kids involved in making them when the weather improves, but for now, it's just too wet outside for them, so I needed to find an alternative approach if we were going to have a weather proof fairy circle.
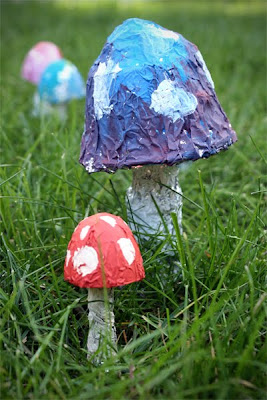
For those of you that haven't heard of fairy circles or fairy rings, they are naturally occuring rings of mushrooms or toadstools. There is a lot of Welsh folklaw surrounding them. They are supposedly the places where fairies gather to dance and make music. many magical happenings are attributed to them. Step inside one and you might dissapear or be compelled to dance by the fairy music until you collapse from exhaustion. Rather exciting!
I figured the easiest way to make these resistant to the nasty rain we have at the moment, was to use a combination of plastic easter eggs left over from last year's easter egg hunt, aluminium foil and acrylic craft paint, with wooden BBQ skewers to stick them in the ground.
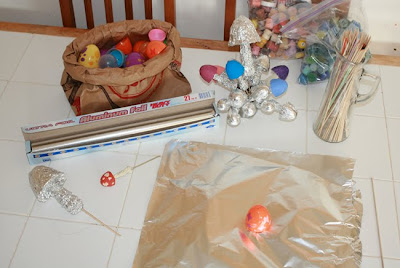
I think that these plastic eggs that are used for easter egg hunts might just be an American thing. I'd never seen them back in the UK, but they are everywhere at the moment here in the US and I'm sure squillions of them get thrown in the trash each year when easter is over too. Well, now you can re-use them, even if you only have one half of the egg.

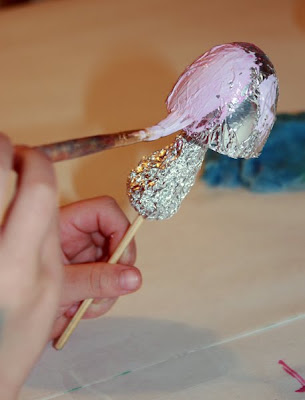
Older kids can make the mushrooms themselves, but it was a bit fiddly for my four and five year olds, so I made the mushrooms and they painted them. I took a square of aluminium foil and places the egg in the center then pulled the foil up around it, holding it like a little cup.

Then I held a BBQ skewer in the egg lid as I scrunched the foil around it. All those with dirty minds can now leave this post.
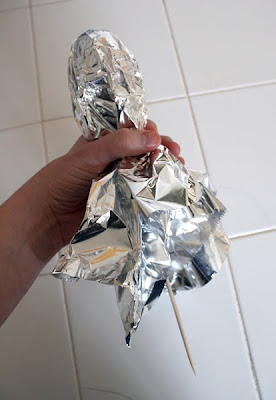
Try to make a loose kind of toadstool stem type shape and as the shape looks like it's coming together, compress the foil to make it as sturdy as you can, but leave the area around the egg opening a little looser.

Once you have shaped the stem, you can slide it up the skewer into the cup of the egg to make a finished toadstool shape.

I had two different sized eggs to use, and I also used a couple of old apple sauce pots for some bigger ones, and a few of the clear plastic dome lids from the quarter machine toys to be teeny tiny mushrooms too.

I'm a very lucky lady, because one of my friends Mona, gave me a whole load of teeny little individual pots of acrylic craft paint. Someone at her workplace was getting rid of them all and she got them for me, knowing that I'd be elated to have so much mess making equipment at my disposal. Thank you Mona!

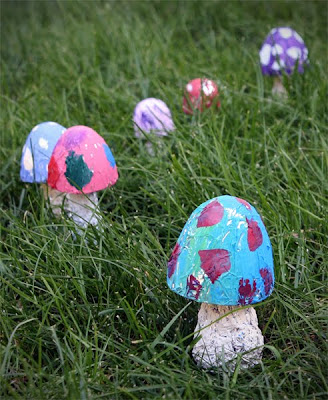
I let the kids loose with some of those little pots of paint, and they did a lovely job of painting the toadstools all different colours. They aren't realistic, but I think they are very bright and pretty. I like the whole wonderous make believe fairyland colours they plastered on.
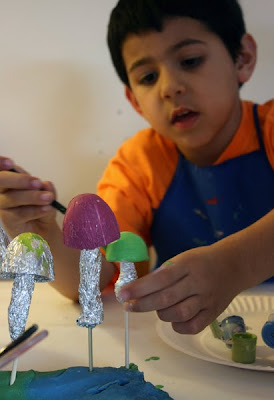
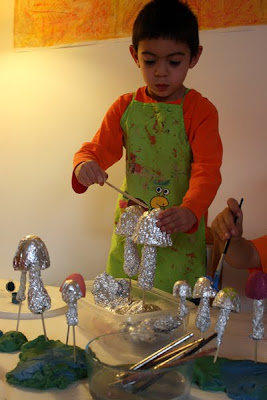
I made sure that they had aprons on this time, because once acrylic paint dries, you can't wash it out! We used a load of our old playdough for them to stick the painted toadstools in to dry. The sticks on them made it easy for the kids to hold them to paint too.

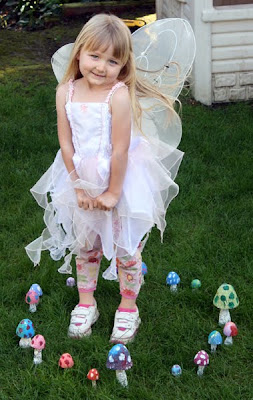
The next day when they were dry, we put them out in the garden in a fairy circle and what do you know! A fairy came to play! (Thank you Jennifer, for that very appropriate birthday present!)


Here's my youngest in her fairy garb. Those wings she is wearing are way older than she is. I think I bought them back in 1999, when I dressed as a fairy for a university event I was volunteering at. They are a bit bedraggled, but have survived well!
I'll let you know how long these shrooms last for. I'm hoping a long time given the materials used. We can always repaint them. The other good thing about using the plastic egg parts is that even if a kid treads on one of these mushrooms with bare feet, then they won't get a BBQ skewer in the foot!
If you want to play with them indoors then just leave out the skewer and squish out the shape of the foil at the bottom to stand them up.


39 comments:
One small bag at £5. That was the only option I could find last year. The uk sucks.
ps always reading, just been rather quiet of late xx
Once again, a fabulous idea. Thanks for being so creative.
Those are so cute!! thanks for the fun idea!!
awesome....as always!
That is very cool. I love that you put them in a circle with a fairy.
That is so, so creative. I love your circle! Thanks so much for sharing, I'll be linking.
You should enter this in the Spring Decor challenge:
http://www.livingwithlindsay.com/2010/02/are-you-up-for-challenge-again.html
They are FABULOUS!
OMG! these are fabulous! I can't wait to make them with Dyllan! Thanks!
So cute! Totally going to try these with my boys this weekend. Great idea!
What an adorable idea! love the mushrooms.
i think these are so great!
i did have to leave the turtorial 'till i could BEHAVE LIKE A GROWN UP as they are very phallic and i'm very immature!
i'll definately having a go at making these over the easter holidays - thanks for the tutorial o)
Che idea fantasticaaaaaaaa!!!
Love it! Come link your cute tute at my party: Thursday's Treasures!!
http://treasuresfortots.blogspot.com/2010/03/thursdays-treasures-week-13.html
I just found your site and am so excited about this craft. I worked on making the mushrooms today and after homework is done, my kids are going to start their painting. Can't wait to see the finished product.
This is a lovely thing for the children to do for the children in the Easter holidays. Thanks so much. I have put the link to your project here on the crafty forums of Moneysavingexpert.com. Hope that is OK.
Great craft! Rainbow mummy - you can get bag of 24 plastic eggs from yellow moon for £3.99 if that's any help.
Thanks snoozerider, I saw some cheaper ones at a place called yellow moon.com, sadly I also saw about a bazillion pounds worth of other stuff I want, sod's law :P
Have you ever read "Summer of the Monkeys?" It is a classic book with a great fairy ring story in it!
I can't wait to make these with my girls. Hopefully this weekend! Thank you for sharing!!!!
i always sound so repetitive every time i leave a comment here, but i just can't help it! i'm always amazed at your incredibly original ideas! :) lisa
I just love this project! Too cute!
These are brilliant! after finding these yesterday, we rushed out and bought the eggs (and they're available at Spotlight in Australia, if any Aussies are wondering where to get them), and we made up a dozen of them. They were so easy and fun to make, thank you!!!
I've just given you the Beautiful Blogger award. Love your blog, so interesting and full of great ideas!
One thing I like about these (vs. the paper bag shroom idea from Doug) is that a small child could take a tumble onto one of your mushrooms and not get skewered, whereas in the paper bag version, that sharp bamboo skewer has no easter egg to buffer the blow.
Thank you so much for investing the time it takes to keep going on this blog!
This is just great!! I love love love your fairy ring!! My two year old is all about fairies and we'll be doing this project for sure!!!!
Thank You! Keep posting inspirational stuff!
xo Sari
Fantastic idea - we're definitely trying that once it warms up.
I just now found your blog following the post at Mama Smiles. Those mushrooms are way cool. Thanks for sharing your brilliance with the rest of us.
Congratulations on making the latest issue of Family Fun! I was reading my copy that came in the mail today and saw that they featured your website!!
Congratulations on being featured in the April edition of Family Magazine!
The cardboard pizza was one of our favorites!!!
Beautiful! It's fun to share the Crafty Crow Foil post with you!
Thanks for another great idea, i just love this one...posted about it on She's Crafty-
http://crafty.littlerockmamas.com/index.php/2010/05/27/aluminum-foil-toadstools/
precious!
We just did this, so fun and lovely - thanks so much! I also posted this on both Twitter and Facebook, it's definitely one of my favorites! :-)
How fun! I'll show my boys and see if they're interested. Sometimes they're into fairies and sometimes not. Your tutorial is well written!
Sharing our link to our fairy ring inspired by you!
http://sariasenith.blogspot.com/2010/04/we-made-magic-fairy-ring.html
xo Sari
simply fantastic view of the rain today we will create them and then put them in the garden, with the idea:)
What an interesting idea. I got a bag of Easter eggs and some aluminium just under $3.00. I just love mushrooms!
P.S. I am your newest follower :)
They are fantastic! Thank you for sharing x
Post a Comment