Hello! Just a fly by post to let you know that I've done a post over on Alphamom.com showing how to make these little Easter rabbits easily from a baby wipe, a Cadbury's Creme Egg, and a little free printable that I made for you to download over there.
They would make a cute little gift this easter for kids to give to their friends. My kids saw me making these ones though, so they are nommed already! Happy Easter my Peeps!
Mar 22, 2013
Easter crafts from the archives
Today is the last day of school before the Easter break here, where the kids get two weeks off school, so I thought now was a good time to post a reminder of some of the Easter/Spring type crafts that we've done over the past few years, in case any of you fancy trying them.
I'm sure we'll be doing some new things over the Easter break, but you know what I'm like, we don't do crafts well in advance to blog about them at the right time. We do the crafts and then I blog about them with the excuse that you might want to do them next year! Ha! So, this is what I found in the depths of the badly organized Filth Wizardry archives of yore...
Hope some of you fancy having a go at one or more of those ideas. I think we may have a bit of a weekend of crafting indoors here, because although yesterday was the first day of spring, today it has already snowed, hailed, and now it is raining/sleeting and blowing a gale, with more of the same forecast for tonight and tomorrow! Brrrrr.
We were going to go down to Bristol for it's Mini Maker Faire, but it looks like traveling in this weather isn't advisable. Thought I'd put the link in there though in case any readers are down south and nearer to it and might want to pop in. It's free and is from 11am until 3pm at Bristol's M Shed museum. This co-incides with the last couple of days of National Science and Engineering Week.
I'm sure we'll be doing some new things over the Easter break, but you know what I'm like, we don't do crafts well in advance to blog about them at the right time. We do the crafts and then I blog about them with the excuse that you might want to do them next year! Ha! So, this is what I found in the depths of the badly organized Filth Wizardry archives of yore...
We were going to go down to Bristol for it's Mini Maker Faire, but it looks like traveling in this weather isn't advisable. Thought I'd put the link in there though in case any readers are down south and nearer to it and might want to pop in. It's free and is from 11am until 3pm at Bristol's M Shed museum. This co-incides with the last couple of days of National Science and Engineering Week.
Mar 14, 2013
DIY custom cookie stamps.
Whooo, it's the month for patron saints everyone! No sooner are we done with Saint David's Day, than Saint Patrick's Day is upon us! We got our leprechaun gold sorted in the form of some golden coin cookies, minted with some home made custom cookie stamps! I've posted about it over on Alpha Mom, with lots of photos and details on what worked best as far as materials and cookie dough went.
Pop and check it out, and even if you're not into the idea of golden leprechaun treasure, this technique can be used to stamp cookies for any event that you want a custom design for, at very little cost! Birthday parties, birth announcements, valentines, Christmas, Graduation, Bad hair days, bin day, days with the letter Y at the end... you get the idea.
For me, I love it because it removes the need to do complicated cookie icing, which I suck at and have no patience for, and you can't dunk iced cookies in your tea! Well, you can, but your tea would be sweet, and eugrchhh sweet tea?! Are you trying to poison me?!
My kids have told me that we need to make custom cookie stamps with the names of the members of our family on. There are some serious cookie ownership issues simmering beneath that request if you ask me. I would feel slightly guilty if I ate a cookie with someone else's name on though, so maybe they have something there.
Do I have any long time readers among you? Do any of you remember way back in the distant past of 2009, when the kids were all tiny and we made golden leprachaun cookies with some friends back in the US. Some Irish friends no less! That's what gave me the idea to try and make our own cookie stamps. Something a bit more suited to my now seven and eight year old's crafting abilities, but still fun and edible. Awww, just look at little barely three year old Ffi, all covered in flour. I'm looking forward to doing more of those preschooler crafts again with Delyth!
UPDATE (16th March 2013): Alpha Mom has cautiously recommended that you do not use the polymer clay version of the stamp on foods. The reason for this is potentially twofold. They are mainly bothered about phthalates (plasticizers that until 2009 were used in all polymer clays). If you purchase your polymer clay from anywhere in the EU, or California then it will be phthalate free due to regulations that were introduced several years ago, but if you are buying it from elsewhere then you will need to be aware of the fact that your clay may contain phthalates.
Polymer clay has been thoroughly tested by ACMI (Art & Crafts Materials Institute in Boston) and by CPSC (Consumer Product Safety Commissions) It has been evaluated to be non-toxic, meaning there are no acute toxicity concerns even when assuming a large (24 mg) daily ingestion of polymer clay, but don't be doing that m'kay? Yuck! Understandably Alpha Mom did not want to recommend the polymer clay option to it's readers when they couldn't be sure if the readers had access to phthalate free clay.
The second issue is that polymer clay is designated as non-food grade plastic. This is not because of toxicity, but rather because it is more porous than food grade plastics, meaning that it is harder to sanitize properly once it has come into contact with food. So, not a good idea to make yourself a dinner plate or a mug to drink your Bovril out of with it, because it could harbour nasty bacteria from the food making it unsafe to use a second time. With this in mind, if you feel that is an issue with using it with raw cookie dough, then you can always make it a one use item and throw the stamp away (the same applies obviously to the salt dough version, which is even more porous than the polymer clay). I will not be throwing away the wooden rolling pin that also came into contact with cookie dough and is porous though, so you've really got to make your own informed decisions about these things.
So, there's a bit of info for you to make a judgement call. If you want to be super cautious then just make your cookie stamps out of the salt dough and then chuck them in the bin when you're done (the stamps, not the cookies silly!).
Here's a hazard risk assessment study done by Duke University Medical Center in 2000 on polymer clay that DOES contain phthalates. (this also addresses the PVC content of the clay for those that are concerned about PVC in their products)
Labels:
at the kitchen table,
food
Mar 11, 2013
Recycling containers with crochet
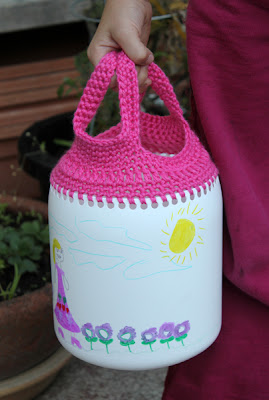
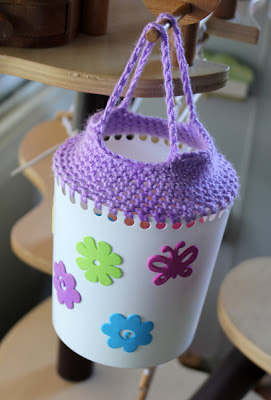
This is a post that has been lurking unfinished in my drafts for YEARS!!! How bad is that! The first one of these I made was I think in 2008 maybe. I've made loads since then, for halloween trick or treat pots, for Easter egg hunt baskets, and just randomly to store things like bits of polly pockets, or pens, or any one of the zillions of odd little collections that the kids have. For a while we had one that contained sparkly bits of asphalt?! I always liked the glass jars with crochet over them thing, but everyone would end up in the ER if I made those and left them around the house. The ones above are made from an old plastic mayo jar and an old plastic cordial bottle, and that way the kids can swing them around their heads and bash them on the floor and no one's going to require stitches. The mayo jar one is my favourite, and it's been used so much. Right now it's full of crayons (you can see Del using it in the background of this pic from the dragon mask post)
You can even make them really small if you have something like a dremel to drill little holes into a travel sized shampoo bottle, and a teensy crochet hook and thread. Very useful for collecting random small objects as my children are wont to do.
This one was for Ffion to use as a trick or treat pot. It was made from an old protein shake plastic jar that a friend gave us.
Anyway, I've been wanting to show you how I make these for ages, because they are really useful for a number of reasons.
- the kids can see what is in them (if you use clear plastic jars or bottles to make them), and can root around for stuff without having to tip it all out.
- They hang up places, or can be carried around easily.
- They are pretty easy to make (very basic crochet stitches) and are really cheap as they are made from old plastic bottles and jars.
- They are virtually indestructible. We've not had to throw a single one out due to breakage yet, despite them being dropped all over the place and flung around.
- I think they look pretty, given that they are made from trash, especially if the kids decorate them with stickers or sharpie pens.
- Because the crochet narrows the opening to the basket, generally if you drop it, whatever is in it doesn't come spilling out all over the floor.
Given all that, and the fact that Easter is around the corner and a few of you that can crochet might want to make kid's Easter baskets with this technique, here's how I make 'em...
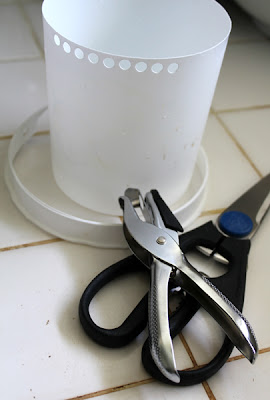
You'll need a plastic container, so go rummage around in your recycling. It doesn't have to be transparent, but the plastic does have to be reasonably flexible if you are going to punch through it with a regular hole puncher. If you have something like a Dremel that you can use to drill holes then you don't have to limited by that. You do need to make sure that your crochet hook can fit through the holes you drill though! I've happily used a hand punch on all the baskets that are shown here (except the tiny necklace one) The easiest to punch through was the yoghurt pot.
If you've got a container with labels on then weight it down in some water to soak them and make them easier to peel off.
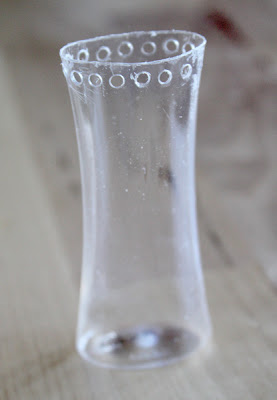
It's handy to note that if you have a container that has printing on it that you want to get rid of first, then giving it a scrub with a Mr Clean Magic Eraser or similar product will take off the printing (on a transparent plastic it will make it translucent though) here's the yoghurt pot with some of the printing scrubbed off.
Sometimes a container will have a thicker rim that you need to cut off to be able to punch around the top. You can see below that I cut off the rim of the yoghurt pot with a pair of kitchen scissors before punching the holes.
Here you can see that I also cut off the top part of the protein shake container before punching the holes into it.
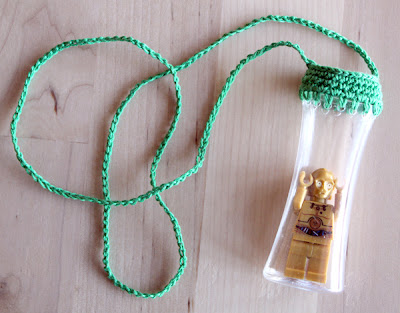
The littlest one was made from a travel sized shampoo bottle that I cut the top off and used a small drill bit to put the holes in it.
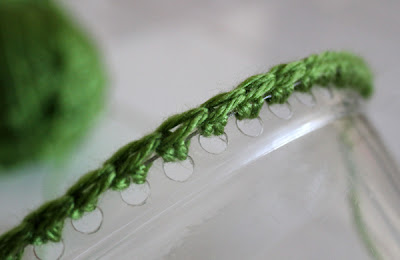
To do the crochet part you can use whatever yarn you like. Chances are if it's going to be dragged around by children you won't want to use white cashmere, but anything will do really. I've used various coloured cheap acrylic scraps for mine. The tiny one was cotton fine crochet thread though. The basic method to start these off is to treat the row of holes as though it is a row of stitches and just crochet into them all the way around the container. I start off with a single crochet into each hole by pulling through the yarn like this to make a second loop on your hook.
and then making a single crochet stitch with it by hooking the yarn over the top of the rim and through the two loops on the hook, like this.
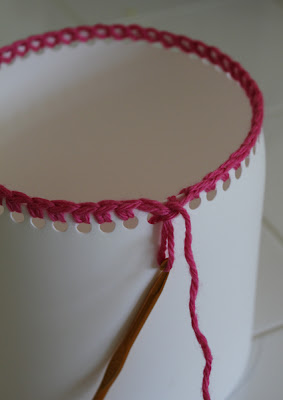
If you keep going round the whole container like that, then you'll end up with a nice base to then crochet further rounds of stitches into.
Here you can see the base round crocheted onto the protein shake bottle in pink yarn. I joined the round with a slip stitch and chained one before starting the next round.From here on out you can just wing it really to get the shape you want from your basket top. Each basket I've made has been different and I kind of like the "make it up as you go" way that these come together. With this one it looks like i made two single crochet stitches into each of the base round stitches, but generally if you do just one stitch into each of the base round stitches then the top will start to pull in like the style of the larger ones I've posted pictures of in this thread.
To make the handles for most of these baskets, I started a round and then made a length of chain stitches the size of the handle I wanted and then joined it again to the round with a single crochet stitch, carrying on around with single crochet stitches and then doing the same thing on the other side for the second handle. Then I just continued to do single crochets into each stitch of the much larger round that now included the handles. A couple of rounds of stitches is enough to make the handles really quite sturdy, but you can see that with Del's little purple easter basket I didn't even bother with that and just left the handles as a single row of chain stitch.
The teensy necklace one just has one big loop of chain stitch for it's handle too.
Once you're done with the crochet (which doesn't take that long unless you make really big handles or something) the kids can decorate their baskets with stickers or sharpie pens.
I need to find more little plastic bottles, because they all want one of the little necklace versions now!
Labels:
at the kitchen table,
Gifts,
recycling
Mar 2, 2013
Milk Jug Dragon Mask
St David's Day at school went well. The kids loved the school eisteddfod and enjoyed wearing their Welsh costumes too. Ffion was happy to wear my old traditional Welsh costume from when I was a kid, but Tomboy Carys was hell bent on being a welsh dragon, so we had to make her costume.
Have you ever wanted to make a dragon mask? Sure you have. Yeah, yeah, you can say you haven't, but I know you have. You'd be mad not to want to make one. So, because you DO have a burning desire to make a dragon mask, and because you are obviously a sensible, frugal individual, and not afraid of a big old mess (because if you are afraid of a big old mess I have no idea why you are here), let me bombard you with a few too many photographs showing you how to make a kick-ass dragon mask out of two milk jugs, some tin foil and a newspaper. Has there ever been a more useful blog post in the history of the internet? No. I'm fairly sure that's what you are thinking.
I hope that there is someone out there that might actually find this a little bit useful, because although we were sort of making it up as we went along, there are squillions of photos.
First of all, you will be needing two of the British style 4pint plastic milk jugs that you have cleaned out and dried. They look like the ones below. The reason that I used milk jugs to make the base of this is because they durable, flexible, easy to cut with scissors and get a stapler through, and they are just sat there in the recycling bin, so, Freeeeee!
We have made plenty of stuff from the US Gallon sized milk jugs while we were living in California, like the Storm trooper helmet and the batman masks. I bet you could still find a way to use the US ones to make a similar design, because they have a larger surface area, so you've actually got more plastic to work with on those.
I started with the first milk jug by chopping off the neck (you'll need to keep this because it'll be used later), then I chopped off the base, and the handle section.
The large piece is going to be the main part of the mask (the sides and top). The smaller handle piece has to be cut and stapled to make the dragon's nostrils. The collection of photos below shows from several angles how we cut down the handle and pushed it together to staple it into a shape that looked like it would work for the nose of the dragon. I think this is the hardest bit to explain in words, hence all the pictures.
Next I used a staple or two on each side to attach the nose to the rest of the head.
Now you want to get your second milk jug, and cut off the neck again (save this one for later too). Cut off your handle, and cut off the lower half of the jug (again keep that to use later) This is the piece that you're left with.
This is going to be stapled onto the back of the mask to complete the back of the head. You still have the handle section from the second milk jug, and that needs to be cut right down to make a piece that can be stuck on over the tip of the nose to make a nice dragony point to it and to cover the front parts of the nostrils that you've made. Here's a series of pictures showing how I got that little bit from the handle.
And here you can see how it fits onto the end of the dragon's nose to complete his face.
You still have the bottom half of the second milk jug, and the sides of that are going to be used to make the little wingy ear bits that go on the side of the dragon's head. I'm not well up on dragon anatomy, so I don't know if these have a proper name. Anyhoooo, here's the picture of the bit you cut them from and how they look before you attach them.
Here they are tucked into the seam where the back joins the side of the head and stapled on. You can see now how useful the curve in the side of the milk jug is to make the ears stand out from the head.
The final part of the milk jug masacre is to use your two neck pieces to make sturdy places that you can have your horns coming out of. I cut the neck pieces right down and used a pen to mark on where I wanted them to go, then I used a pair of nail scissors to cut out the circles and push the neck pieces into place from the inside of the mask. A good squidge of hotglue held them securely.
So, here's what your finished underlying milk jug structure should look like. Lightweight and sturdy.
Out of the two milk jugs that you've used, all you have left are some offcuts and the two bases!Now for some tin foil and hot glue fun! This is the least documented section of the project, because all it is really is squishing large sheets of tin foil onto your base to make the dragon have the features you want. We used the tin foil on our mask to flesh out the nostrils, to add some head ridges, to add a couple of facial horns, and to sculpt the side of the dragon's mouth. We also added a couple of spikes to the back of his head and most importantly, we twisted up some tin foil horns and stuck them through the necks of the bottles that we glued on the top of the dragon's head. We used lots of hot glue to smoosh the sections of tin foil onto each other, so that there weren't a load of loose bits sticking up when we came to add the papier mache layer. The top image is after three sheets of foil have been added, and the bottom picture is when all the foil has been added (I think we used about five or six strips from the roll that were about a foot and a half to two feet in length, so not that much foil really.
The beauty of using tin foil to do this part is that you can add volume really quickly and easily and it adds very little weight to the mask, and when the tin foil is compacted on it is very sturdy and easy peasy to papier mache over.
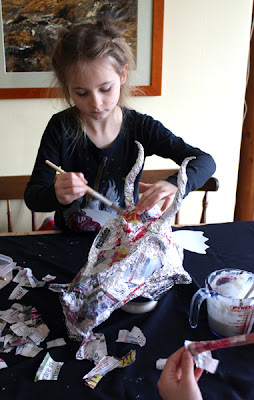
The kids really got stuck into the papier mache part of the project, and my job was really just ripping up the newspaper while they stuck it on. The horns would have been harder for them to do with bits of paper, so we wrapped them in crepe paper from a streamer roll and then pasted them with the flour and glue mixture instead. To make it easy for the kids to get at, we sat the mask on top of a ceramic jug, so the back of it was raised slightly off the table.
All of the project up to here was done on a Saturday morning, but once the papier mache is on, you have to wait for it to dry, so that's going to take about 24 hours before you can get painting and decorating your mask.
Here's a few pictures of the mask with the dry papier mache, before any painting was done.
My older daughter loved the papier mache part the most, but my middle daughter was really into the painting part. I had a tester pot of red paint from a hardware store that I'd planned to paint something for Delyth with months ago and hadn't got around to, so we used that to give the dragon a base coat colour that we could decorate on top of. It gave really good coverage and you couldn't see the newspaper print through it at all, so we only needed the one coat.
Here's Mr Dragon with his snazzy paint job. You can see the structure of the mask really well with the plain paint job, so I took a few pics from a few angles.
Here's a pic of the inside of the mask (you can see that we made the papier mache go over the edges and onto the inside a bit). You can also see the tin foil smooshed ends of the horns on the inside of the mask too, which helped keep the horns anchored while you're papier macheing them.
We used another couple of bits out of the recycling bin to decorate the finished mask. For the teeth and eyes we used a bit of cardboard from a school shirt package and the white polystyrene from a pizza package.
Again everything was stuck on with hot glue. We happened to have a load of red hot glue sticks that a friend found at a charity shop in the US and gave to us last Christmas, so those were perfect for this! and we had some red heart sequins that got smooshed into the glue to add a bit of bling around the eyes.
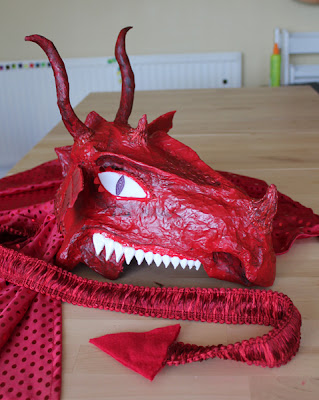
Our mask at this point was ever so slightly front heavy, so we added a winged cape and dragon tail to the back of it, which weighted it perfectly and also meant that our costume was complete with just the one item.
Extra decorating included painting on some darker red paint and gluing more sequins on, plus hot glue and glitter scales in places. We weren't too neat about it, but the results are pretty good.
The material all came from two 60p bundles that we found outside a fabric remnants place not far from here, so this has to be one of the cheapest costumes we've made.
Here's the back of the mask where the cape is attached.
and here's how it all looks from the back with the cape and tail...
The fabric bundle also had a little bit of red fleece in it, so I lined the mask with that to make it really comfortable to wear (again it was all hot glued on).
Here's kiddo rocking the finsished mask.
She's so happy with it! And very proud that she was so involved in it's creation. I know this is is ridiculously involved and detailed tutorial, but I'm hoping that there will be some people who find the techniques we used useful in building other types of masks on the cheap, for example it wouldn't take much alteration to make this be a horse mask, or a unicorn mask, and with a change of underlying plastic milk jug structure and a bit of imagination I'm pretty sure you could make any kind of mask you want in this way. There we go, that made me feel a little less like a nutter for posting all this. We had fun making it, and I think that's the important bit!
Labels:
at the kitchen table,
recycling
Subscribe to:
Posts (Atom)


