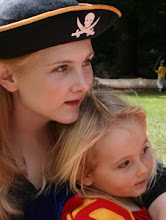
As part of the lead up to the party for my now 4 year old I drew some pictures for her and her little friends to colour in. The first one was a picture of what a pirate-superhero-mermaid looks like, because, let's face it, it's an unusual birthday party theme and I thought the other kids might get thier heads around my daughter's notion a little more whole heartedly with some visual aid. I posted the digitally coloured version in one of my previous posts (yep, she's got pink hair like I used to have back in uni)
The second image was a map of pirate-mermaid-superhero island, which was a fantasy representation of the play park that we were holding the party at. We hid the treasure in the hollow part of the tree at the park and the kids followed the map from the play structure that we made into a pirate ship with cardboard, to the batcave (tent full of dressing up clothes), to the captain's table (picnic table with snack food), to the picnic villages (blankets for eating picnic food on), to the mermaid rocks (benches at the top end of the park), to the tree at the very top of the park. The whirlpool at the bottom of the map is actually a really big storm drain that the kids always want to go and peer into and poke at with sticks.

So click on the little images of the colouring pages to view the full size versions and feel free to print them out for your kids to colour too. The sidekick flying pirate starfish is called Aaaarrrg by the way.
This is what the batcave looked like...

and this is what the pirate ship play
structure looked like...

By the way, if you are after some really awesome free colouring pages then have a look at the ones on
Louise Elliot's site. She sells printed cloth kits of her own elaborately patterned designs for soft toys and rag dolls. She offers free downloads of colouring pages featuring her animal designs, which are beautiful and my 4 year old has had a lot of fun with them already. Here is the last one she coloured from Louise's site...


 The kids cut up and glued on more of the green streamers to look like leaves and then they scrunched up balls of red streamer to be the berries. I made some bows out of the red streamer for them to stick on the bottom and then we couldn't resist adding a little glitter too.


 I think the little newspaper ones looked the cutest. They were made with just one sheet of newspaper.


 The base boards were each a side of a cereal packet wrapped in aluminium foil and then the condiment cups were glue gunned on top.
 The kids stuck snowflakes all over while I printed out thier names to stick on, and then we filled up the cups with sweeties.
 Sticking on the circles of tissue paper was going to be a bit too fiddly for my two preschoolers, so that was done after they had gone to bed.
 Smashing through the tissue paper to get to the treats is as much fun for them as smashing through the foil on a new jar of coffee is for me ;)
 Hang them up high unless you have saintly children!


 I taped some ripped up bed sheet onto cut up cardboard (that we have a never ending stash of courtesy of Costco raids) to make kind of easy to draw on canvases that wouldn't let the pens bleed through onto other stuff. The kids then drew whatever they felt like onto the sheets with permanent markers (coloured sharpies). The four and six year olds did a great job drawing dinosaurs, trains, robots and all sorts, and the two year olds just had at it with scribbly patterns and a couple of smiley faces.

 In the photos you can only see five of the kids that were over, because by the time we had all 8, I no longer had a spare hand to take a photo, especially with magic markers in the equation. Surprisingly no one drew on anything or anyone they weren't supposed to, so that's a good day right there!
 Once they had finished their drawing, they tore off the tape and fabric and I pinned the pictures to a yellow bed sheet and cut them out and hemmed them with the sewing machine, leaving a small gap to turn them inside out. The kids then filled the toys/cushions with stuffing (this took quite some time, because it was also very fun just to play with the mountains of fluffy stuffing).


 With that in mind I cobbled together a load of stuff that they could sew/weave, without maiming themselves or each other. Lots of this stuff was found in Goodwill and Savers, but a lot was also random stuff from around the house. The lovely wooden teddy/fish/dog threading panels were a present from one of our friends back in the UK. The plastic punnets that you get berries in work well too for weaving and a random odd jelly shoe (no idea where the other one got to). Bits of rags, shoe laces, ribbons, pipe cleaners. It all fits nicely in the plastic tote, that can also be woven (50c from Goodwill! I love Goodwill).
 It's been a big hit and a really really cheap present for them that they can play with together. I was going to save it for Christmas, but we've had 2 weeks of illness in our house and quiet time play things were badly needed.


 Simply cut the neck of the bottle out to make the fish mouth. I then glued one of those little paper condiment cups into the hole to make cute little fish lips. Cut the bottom off the bottle and then squash the sides flat onto each other to cut out the tail and fins. Use a couple of bits of tape to hold the tail together.
 I cut out a load of construction paper into scale shapes and the kids glued them on, some very tidily and some willy nilly, but when they were all done they made a very cute reef full.
  Here's the lagoon under the play structure with the spent piniata.
  My kids loved the fact that they looked like the fish out of the book "Rainbow Fish", which is one of thier favourites.